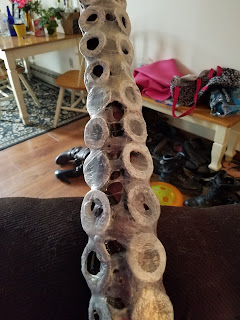
So if you’re a haunter or Halloween enthusiast, and you’ve been
waiting for me to post me something related to that well this might be your
lucky day. I apologize it took so long, there was just things I needed to get
off my chest first on here. But in this post I will show you the steps I took to make my own
tentacle props. To buy one from the store can cost a ton of money, trust me I’ve
looked. But this is a cost effective way to make them. I can’t take all of the credit;
I’ve gathered knowledge from a few different people’s techniques and put my own
spin on it. I also apologize that I did not take pictures as I went through the
steps. When I made them, I had no clue I was going to do this post. But here
you go, hopefully you like what you see.
What you will need:
PVC pipe-the size is up to you, depending how big you want
your tentacle(s) to be.
Fiber Fill- You can get a big bag of this at a craft store
or Wal-Mart for around $10.
Saran Wrap- I always got a roll for $8 from somewhere like Wal-Mart
or Lowes. When it’s in a roll form, it’s much easier to do this project.
Liquid Latex- If you are only doing a few of these you can get a
small thing of liquid latex. Since I dabble in a few projects and I did a bunch
of these, I got a gallon of Monster Makers Liquid Latex off of Amazon.com for around
$60 I think it was.
Acrylic Paints- The colors are up to you. I use red, black,
and white.
PVC pipe insulators- These will be found in the hardware
store where you get the PVC pipes themselves. They are long black fittings
designed to fit over the PVC pipe, but that isn’t what they will be used for
here. These will be your suction cups, I get three different sizes, to try and make
the tentacle slightly more realistic. Here is a random site to show you what
they look like. http://www.supplyhouse.com/K-Flex-6RXL048058-5-8-Pipe-OD-x-1-2-Wall-Insul-Lock-Pipe-Insulation-6?gclid=CjwKEAjwmf6-BRDi9fSN7Ijt1wUSJAASawcj5HN6TzOqkD4YSyGWMBjWEqE7rzPTJGOASbyl9N8uGRoCAWTw_wcB
Heat gun- Before I acquired a heat gun, I used a blow dryer
to melt the saran wrap. But a heat gun is a better and easier choice.
Step One-
Take your PVC pipe and cover it with fiber fill. You want to
then take the saran wrap and seal in the fiber fill over the PVC pipe. The saran
wrap will give the tentacle life like skin texture. The fiber fill will be the
insides of the tentacle. This part can be tricky, you need to hold the fiber
fill over the PVC pipe and wrap at the same time. At the tip of the tentacle I
go off the PVC and make a triangle shape with the fiber fill, and then wrap it
tight, that gives it a tipped point like an actual tentacle is. On the other
end I leave a few inches of PVC showing, so I can connect them all together at
the end or possibly build a full octopus creature one day with them. That part
is up to you I suppose.
Step Two- I take the liquid latex and do one thin coat on
each side. This can be time consuming, because you have to wait for the first
side to dry, then flip it over and do the other side and wait for it to dry. I
like to do this, so it holds it all together and seals it before you apply the
paint.
Step Three- Take your choice of paint for the base of your
tentacle and apply that. Again with the tentacle being the shape it is, you’ll probably
have to do one side then the other after it dries. I took red paint and mixed
it with a tiny bit of black, to make a darker maroon color for mine. I use
acrylic because its water proof and you never know when stuff like this can get
wet.
Step Four- This is a good step to do while you’re waiting for
the paint to dry, take the pipe insulators and cut them into small circles.
Like I said I got 3 different sizes, I cut about 20 of each size per tentacle. I
made them about 1.5 inches thick.
Step Five- After the paint dried, I took a hot glue gun, and
glued the suction cup pipe insulators onto the tentacle. I started near the top
with the smallest ones and did rows of two, all the way down, putting the
biggest on the bottom. I used hot glue which kind of melts them a little bit,
so if you have a better adhesive, go for it.
Step Six- Once the suction cups are stuck on pretty good. I
took white paint and painted them.
Step Seven- I then took the saran wrap again and wrapped a
thin layer over the entire suction cups sections.
Step Eight- I took the heat gun and melted down the front
area of the saran wrap over the suction cups. This gives it a slimy look.
Step Nine- Take your paint of choice and re paint over the
back part to cover the new layer of saran wrap.
Step Ten- I then applied one more layer of liquid latex over
the entire thing to seal it all in and it also adds to the slimy factor look of
the newest layer of saran wrap.


No comments:
Post a Comment